Mastering ServiceNow: Filtering RITMs by Variables Made Easy
Introduction
In the complex ecosystem of ServiceNow, efficiently managing Requests for IT Service Management (RITMs) is paramount. One common challenge users face is filtering RITMs by specific variables. Despite the platform’s extensive capabilities, the conventional method of displaying variables in the list view via personalization is often unavailable. In this guide, we’ll navigate through this hurdle step-by-step, empowering users to filter RITMs effortlessly by variables.

Identifying the Need
RITMs often involve numerous variables dictating their flow and resolution. Filtering by specific variables streamlines management and accelerates resolution. However, the option to display variables directly in the list view via personalization is unavailable.
Overcoming the Limitation
While personalization doesn’t offer direct variable display options, there’s an alternative route. ServiceNow’s advanced search and filter functionalities provide a solution. Users can leverage search queries to filter RITMs by variables, even without visible variables in the list view.
Specifying Filters
Users can specify filters by selecting variables. This process involves navigating to the list view and utilizing the search or advanced search options. Here, users input their criteria to generate a filtered list of RITMs.
Choosing Catalog Item, Variable, and Value
To specify filters, users select the catalog item, variable, and value they’re interested in. This step ensures precise filtering tailored to their requirements.
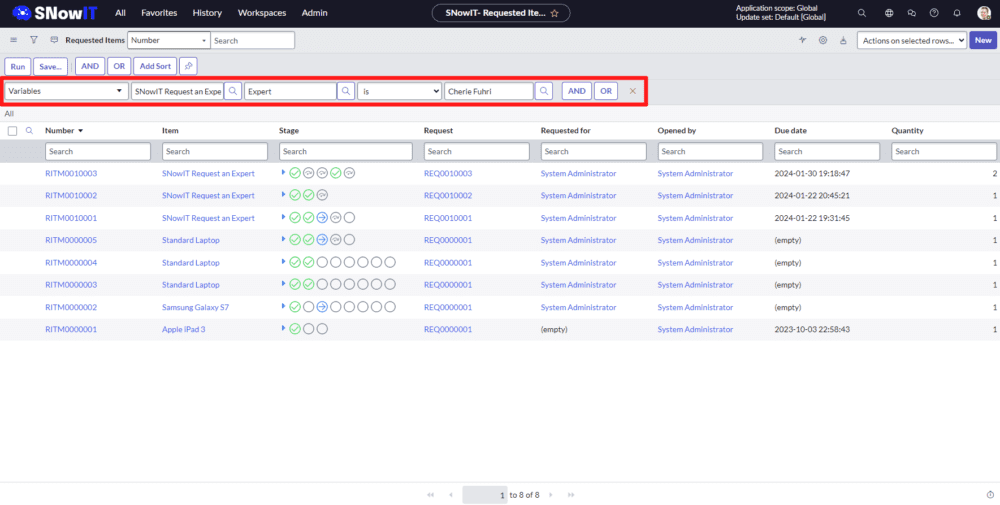
Filtering the List
Once the user specifies the catalog item, variable, and value, the list is filtered accordingly. Users can now view RITMs that meet their criteria, enhancing efficiency and focus in managing IT service requests.

Conclusion
Filtering RITMs by variables in ServiceNow may initially seem challenging due to the absence of visible variable options in the list view personalization. However, by leveraging advanced search queries and specifying filters based on catalog items, variables, and values, users can effortlessly filter RITMs to streamline management processes. This method not only overcomes the limitation of unavailable personalization options but also enhances productivity and effectiveness in handling IT service requests within ServiceNow.
SNowIT ServiceNow: Flow Designer series
Introduction
Greetings, fellow ServiceNow enthusiasts, developers, and IT professionals! We are thrilled to introduce you to the “#SNowIT ServiceNow: Flow Designer” series, meticulously crafted to illuminate the core aspects of ServiceNow’s formidable Flow Designer tool. Presented by SNowIT, this comprehensive playlist is designed to equip you with the knowledge and skills necessary to harness the full potential of Flow Designer.
Overview
In this series, we embark on a journey through six insightful episodes, each dedicated to unraveling the intricacies of ServiceNow’s Flow Designer:
1. Introduction: Embark on your Flow Designer journey with a comprehensive introduction. Learn about the significance of Flow Designer, explore its key features, and discover how it can revolutionize your workflow processes.
2. Flow: Delve into the fundamental building block of automation – Flow. From creation to customization, optimize flows to align with your organization’s unique requirements.
3. Subflow: Explore the world of subflows and unlock their potential in enhancing modularity and reusability. Learn best practices for designing efficient and scalable subflows.
4. Action: Discover the diverse range of actions available in Flow Designer. Master the art of crafting powerful actions, from simple operations to complex integrations.
5. Testing: Ensure the robustness of your workflows through effective testing strategies. Identify potential bottlenecks and validate functionality before deployment.
6. Extras: Uncover hidden gems within Flow Designer with bonus tips, advanced techniques, and real-world scenarios. Elevate your expertise and take automation to the next level.
+7. Washington Release: Explore what’s new for Flow Designer within the Washington release. Stay updated on the latest changes and enhancements.
Join Us on the Journey:
Whether you’re a seasoned ServiceNow aficionado or just starting your journey, this playlist is tailored to empower you. Subscribe to SNowIT for more insightful content, and let’s embark on a collaborative quest to master Flow Designer together!
Exploring ServiceNow’s “Always Show Top Navigation” Feature
Intoduction
ServiceNow, the cloud-based platform that enables digital workflows, has continually evolved to enhance user experience and streamline business processes. Among the many features introduced, the “Always Show Top Navigation” feature stands out as a valuable addition since the San Diego version.
What is “Always Show Top Navigation”?
The “Always Show Top Navigation” feature in ServiceNow is a user interface enhancement that provides a seamless and persistent navigation experience for users. Traditionally, the top navigation bar might hide as users open a recordon the new page, limiting quick access to essential menu options. With this feature, the top navigation bar remains fixed at the top of the screen, ensuring easy access to critical functionalities at all times.
How Does it Work?
Starting from the San Diego version, ServiceNow users can enable the “Always Show Top Navigation” feature from their personal preferences. To activate this feature:
- Log in to your ServiceNow instance.
- Navigate to your user profile.
- Open the “Preferences” tab.
- Look for the “Always show top navigation” option and enable it.
Once activated, the top navigation bar will stay visible, providing users with a consistent and efficient navigation experience.
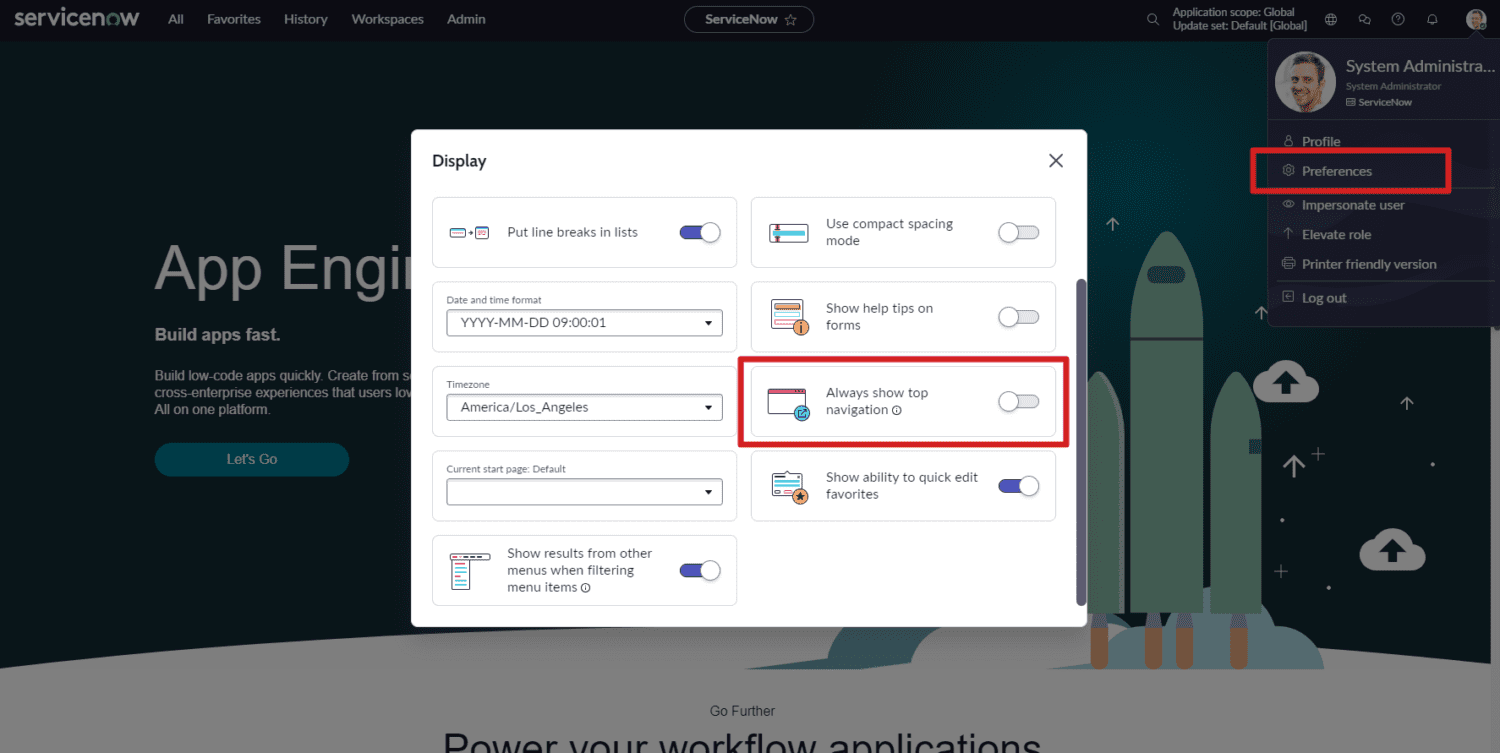
Image 1: User preferences.
Benefits of “Always Show Top Navigation”
1. Improved Accessibility:
Users can quickly access various modules, applications, and features. This is particularly beneficial for users who work with multiple applications and need swift navigation between different sections.
2. Enhanced User Productivity:
The persistent top navigation bar reduces the time and effort required for users to locate and access specific functionalities. This results in improved efficiency and overall user productivity.
3. Streamlined Workflows:
With the top navigation always visible, users can seamlessly transition between different tasks and modules, contributing to a smoother and more streamlined workflow.
Screenshots
Here are a few screenshots illustrating the “Always Show Top Navigation” feature in action:
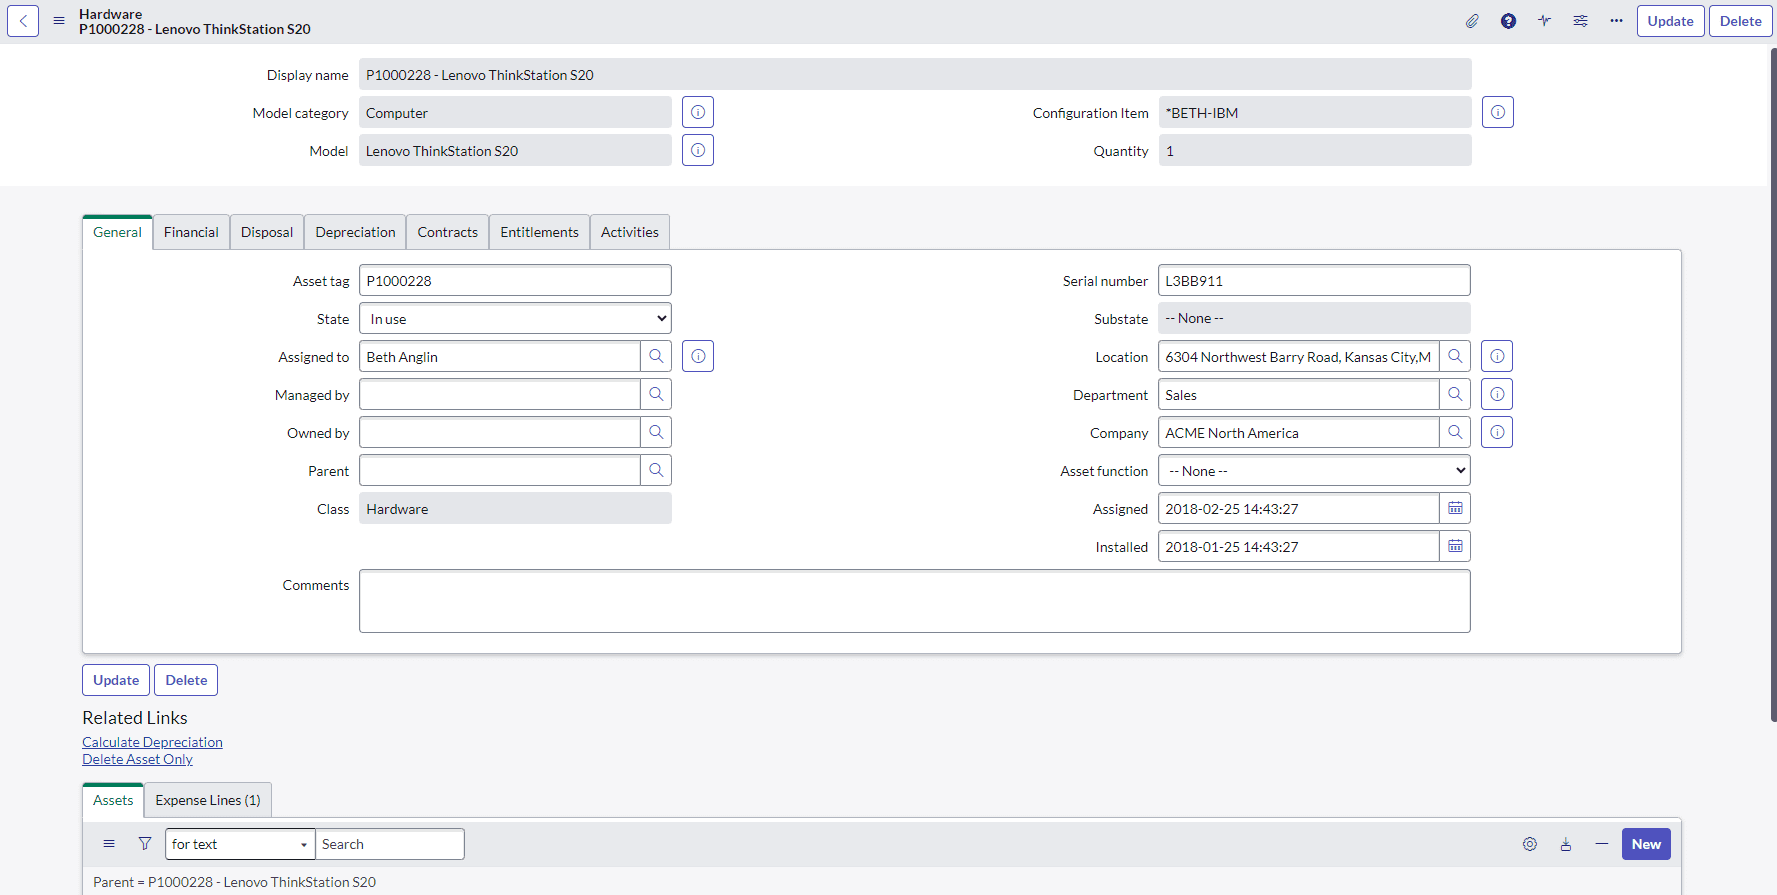
Image 2: Top Navigation Bar before enabling “Always Show Top Navigation.”
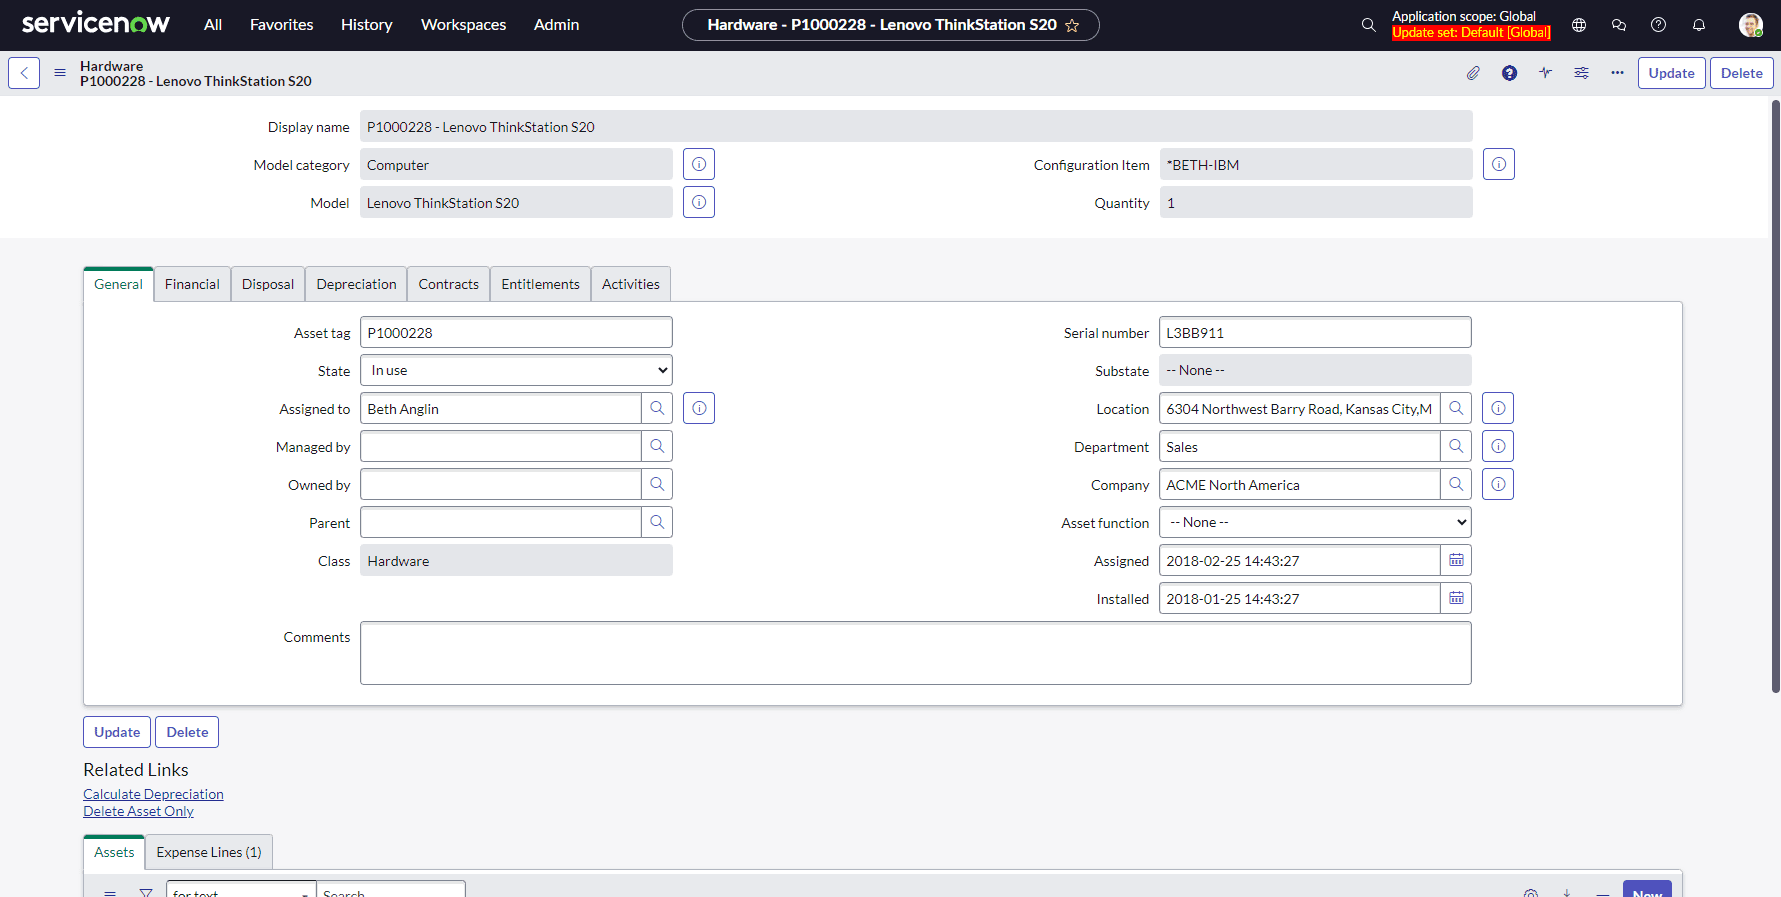
Image 3: Top Navigation Bar after enabling “Always Show Top Navigation.”
Conclusion
ServiceNow’s commitment to user experience is evident in the introduction of features like “Always Show Top Navigation.” By offering a persistent navigation bar, users can navigate the platform effortlessly, leading to increased productivity and an overall improved user experience.
Upgrade your ServiceNow experience today by enabling the “Always Show Top Navigation” feature and enjoy a more efficient and user-friendly interface. Stay tuned for more updates from ServiceNow as they continue to innovate and enhance their platform.
Unveiling ServiceNow’s Washington Release: Revolutionizing Workflows with SnowIT
Introduction
We are thrilled to unveil the groundbreaking updates that come with the Washington Release to ServiceNow platforms, focusing specifically on the Flow Designer. At SNowIT, our commitment to enhancing user experience and efficiency is at the forefront, and we can’t wait for you to explore these transformative features!
New Workflow Studio UI
Prepare for a fresh and intuitive experience as the Workflow Studio UI undergoes a significant facelift. The updated design aims to make workflow design a breeze, ensuring a seamless user experience.
Edit Flow Button
Introducing the Edit Flow button – a key player in intentional editing. This feature prevents accidental changes by requiring users to click the button before diving into edits, putting control firmly back in their hands.
Diagram View Enhancements
– Try Catch Available: Handle exceptions effortlessly with the already existing try-catch functionality.
– Annotation & Details Toggler: Dive into the specifics with ease by toggling annotations and details as needed.
– Error Handler Toggler: Simplify error management with the convenient error handler toggler.
New Fire Event Action
Ignite your workflows with the powerful ‘Fire Event’ action, opening up a world of possibilities for automation and dynamic process handling.
New Flow Triggers
We’re expanding your options! Discover a range of new triggers to tailor your workflows to specific events and conditions, providing a more personalized and responsive automation experience.
New Flow Reporting Settings
Stay in control with enhanced reporting settings, providing you with deeper insights into your workflow performance. Understand and optimize your processes with the new reporting features.
Guided Tour: Exploring the Changes
To guide you through these groundbreaking updates, we’ve prepared a detailed walkthrough in our latest YouTube video. It explains each change in depth, giving you a firsthand look at how these features will redefine your ServiceNow experience.
Join the Conversation
We believe these enhancements will revolutionize your ServiceNow experience, and we’re eager to hear your thoughts! Which feature are you most excited about? Share your feedback in the comments below and let’s spark a conversation.
Thank you for being a part of the SnowIT community!
Exploring REST Messages in ServiceNow: A Comprehensive Guide
Introduction
Welcome to another informative post on SNowIT’s Blog! In today’s discussion, we’ll be delving into a powerful feature within the ServiceNow platform – REST messages. As we explore the capabilities and intricacies of REST messages, you’ll gain insights into how this feature can significantly enhance communication and integration in your ServiceNow environment.
Understanding REST Messages
REST Architecture Overview: REST messages in ServiceNow operate on the principles of Representational State Transfer (REST), providing a lightweight and scalable approach to data communication. This architecture facilitates seamless exchanges between ServiceNow and external systems, making it an essential tool for effective integration.
Key Features
1. Endpoint Configuration: REST messages are configured with specific endpoints, defining the locations where communication will occur. This ensures precise and targeted data exchanges.
2. HTTP Methods: Supporting various HTTP methods such as GET, POST, PUT, and DELETE, REST messages offer versatility in data interactions, catering to different integration scenarios.
3. Authentication: Security is paramount, and REST messages support different authentication methods, guaranteeing secure communication between ServiceNow and external systems.
4. Transformers: REST messages employ transformers to facilitate data transformation between different formats. This feature streamlines the adaptation of data structures, ensuring compatibility between systems.
Setup and Configuration
1. Create a REST Message: Initiate the process by defining a REST message. Specify the endpoint, HTTP method, authentication details, and any required headers to establish a connection.
2. Create an HTTP Method: Tailor the communication process further by creating custom HTTP methods if the standard options do not meet your specific requirements.
3. Define Transform Maps: Transform maps play a crucial role in data transformation between ServiceNow and external systems. Define these maps to ensure seamless compatibility.
Usage and Examples
With the REST message set up, you can leverage its capabilities in various ways:
1. Integration with External Systems: Integrate ServiceNow seamlessly with third-party applications, enabling efficient and secure data exchange.
2. Automation: Automate processes by triggering REST messages based on specific events or conditions within the ServiceNow environment, streamlining workflows.
3. Orchestration: Incorporate REST messages into orchestration workflows, simplifying complex processes and enhancing overall system efficiency.
Conclusion
In conclusion, REST messages in ServiceNow are a versatile tool that empowers users to create robust integrations, automate processes, and streamline workflows. Whether you’re a seasoned ServiceNow user or just getting started, incorporating REST messages into your toolkit can elevate your system’s capabilities.
If you enjoyed this post, be sure to check out our accompanying video on the same topic for a more visual walkthrough. Don’t forget to subscribe for more insightful content, and feel free to share your thoughts in the comments section below.
Thank you for joining us on this exploration of REST messages in ServiceNow. Stay tuned for more exciting insights into the world of IT service management and technology integration!
Unveiling Update Set Enhancements in ServiceNow’s Vancouver Release
Introduction
In the ever-evolving landscape of ServiceNow, staying up-to-date with the latest releases is crucial for harnessing the full potential of the platform. With the recent Vancouver release, ServiceNow introduces several enhancements to the Update Set functionality, revolutionizing the way administrators and developers manage their configurations.
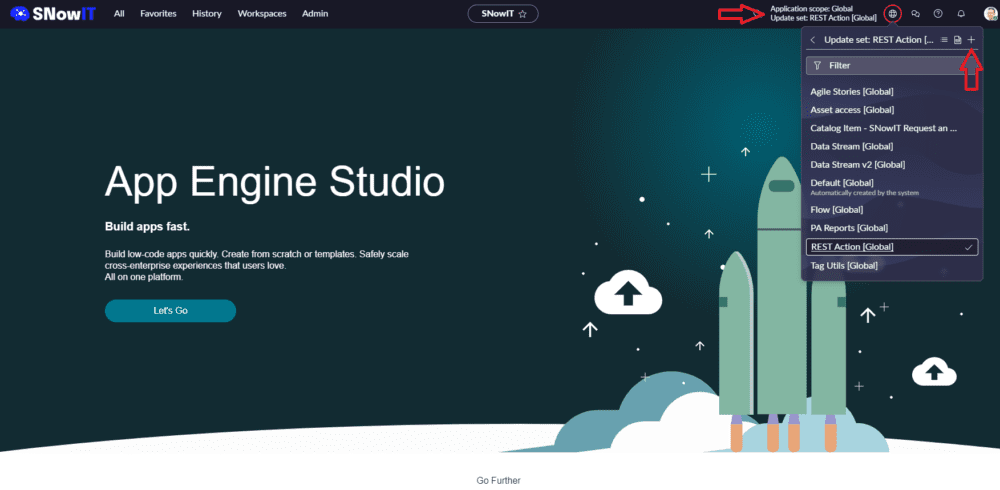
Current Scope and Update Set Display in Banner
One of the standout features of the Vancouver release is the persistent display of the current scope and update set in the banner. No more navigating through multiple tabs to find the active configuration – it’s now prominently showcased at the top of your screen. This improvement brings enhanced visibility and simplifies the tracking of your working scope, streamlining the development process.
“Add” Button for New Update Set
Creating a new update set has never been more straightforward. The addition of the “Add” button in the update set selection area is a game-changer. Now, with a single click, administrators and developers can initiate the process of creating a new update set. Let’s walk through the simple steps to leverage this feature:
- Navigate to the Update Set picker.
- Click on the “Add” button.
- Name your new update set and provide a brief description.
- Save and start working on your fresh update set.
Improved Workflow Efficiency
These enhancements contribute significantly to improved workflow efficiency. By providing a clear view of the current scope and simplifying the creation of new update sets, ServiceNow empowers users to work more effectively. Time-saving aspects are apparent, making it easier for teams to adhere to best practices in update set management.
User Feedback and Early Adoption
Early adopters of the Vancouver release have expressed positive feedback regarding the update set improvements. Users appreciate the streamlined workflow and the newfound efficiency in managing configurations. Here’s what some of them have to say:
“The new update set display in the banner is a game-changer. It saves me time and frustration when working on multiple configurations simultaneously.” – Jane, ServiceNow Administrator
Conclusion
In conclusion, the Vancouver release’s update set enhancements mark a significant stride forward in the ServiceNow user experience. The improved visibility and simplified processes contribute to increased efficiency and a more seamless development journey. We encourage all ServiceNow users to explore the Vancouver release, upgrade their instances, and embrace these transformative features.
Release Notes: https://docs.servicenow.com/bundle/vancouver-release-notes/page/release-notes/family-release-notes.html