ServiceNow: Scripted REST API with API Key
Introduction
Setting up API key authentication for scripted REST APIs in ServiceNow can streamline your integration and ensure secure access to your APIs. This guide will walk you through each step, from setting up an authentication profile to testing the integration. By following these steps, you’ll have a secure and well-configured API key authentication process ready for use with your ServiceNow REST APIs.
Step 1: Set Up an Authentication Profile
To begin, configure an authentication profile in ServiceNow to manage how your API keys are processed.
- Navigate to the Inbound Authentication Profile Section: Go to System Web Services > API Access Policies > Inbound Authentication Profile in your ServiceNow instance.
- Create an API Key Authentication Profile:
- Select the option to create a new profile dedicated to API Key authentication.
- Define the appropriate authorization parameter. Typically, you can set this to authorize users via the Auth header or Query parameter, depending on the level of security required by your integration.
Choosing the Auth header ensures that sensitive information is not exposed in the URL, which is generally recommended for added security. Alternatively, if you prefer a simpler setup, using the Query parameter is another option, though slightly less secure.
Step 2: Set Up an API Key
The next step involves creating the actual API key that will be used for authentication.
- Navigate to the REST API Key Section: Go to System Web Services > API Access Policies > REST API Key.
- Create a New API Key:
- Define a Name for the API key that is easily identifiable for future reference.
- Select the User who will have access to this API key. This user should have the appropriate permissions to interact with the specified REST APIs.
- Copy the Token generated for this key. The token is a unique identifier for API access and will be used in the authorization part of your API calls. Ensure that this token is stored securely, as it provides direct access to your REST APIs.
Step 3: Configure an API Access Policy
With the API key created, you need to configure an access policy to control the conditions under which the API key can access your scripted REST APIs.
- Navigate to REST API Access Policies: Go to System Web Services > API Access Policies > REST API Access Policies.
- Create a New API Access Policy:
- Define a Name for the access policy that reflects its purpose.
- Select the REST API (specifically, the scripted REST API) that this policy will apply to.
- Configure additional attributes as needed, such as whether the policy should Apply to all methods (e.g., GET, POST, PUT, DELETE) and any other conditions relevant to your setup. Customizing these attributes ensures that the access policy fits the intended use case and restricts API key usage as needed.
Step 4: Test the Integration
Now that your API key and access policy are configured, it’s essential to test the integration and verify that everything is working as expected.
- Test the API Key Authentication: Use your dedicated API token (generated in Step 2) and insert it in the manner specified in your authentication profile—either in the x-sn-apikey header or as a query parameter, depending on the setup.
- Verify Successful Authentication:
- Send a request to your scripted REST API with the API key. Confirm that the request is successfully authenticated using the API key token.
- Check that the API responses are returned as expected and that no authentication errors occur.
- If there are any issues, double-check the access policy settings and the way the API key is passed in the request headers or parameters.
Conclusion
Setting up API key authentication for scripted REST APIs in ServiceNow enhances security and provides a reliable means to control access. By carefully following these steps—configuring an authentication profile, creating an API key, setting up an API access policy, and testing the integration—you’ll establish a secure foundation for managing API access. This setup also gives you the flexibility to adjust permissions, ensuring your APIs are accessed securely and as intended.
By implementing this API key authentication method, you’ll be well-prepared for secure ServiceNow REST API interactions, allowing authorized users to integrate with confidence.
Enhancing Error Handling in ServiceNow: The Power of NiceError()
Introduction
In the ever-evolving world of IT service management, ServiceNow continues to innovate and provide developers with powerful tools to enhance system performance and reliability. One of the critical aspects of robust application development is effective error handling. Traditionally, ServiceNow developers have relied on the Error() function to capture and display error messages. However, with the introduction of NiceError(), there’s a new, more informative way to handle errors that offers deeper insights into application issues. In this post, we will explore the transition from Error() to NiceError() and discuss how this change can improve your debugging and troubleshooting processes.
Why Error Handling Matters
Error handling is a fundamental aspect of software development. It ensures that applications can gracefully handle unexpected situations, provide useful feedback, and maintain stability. Effective error handling helps developers identify the root cause of issues quickly, minimizing downtime and improving user experience. In complex platforms like ServiceNow, where multiple processes and integrations are in play, having robust error handling mechanisms is essential to maintain the integrity and reliability of the system.
The Limitations of Error()
The traditional Error() function in ServiceNow has been a staple for logging error messages. While it serves its purpose by alerting developers to issues, it falls short in providing the full context needed to understand and resolve the problem efficiently. Typically, Error() will log a basic error message, which might look something like this:

The output, in this case, is just the error message „An error occurred!” without any additional information about where or why the error happened. This lack of detail can make troubleshooting more challenging, especially in complex scripts or workflows.
Introducing NiceError()
Enter NiceError(), a new error handling method in ServiceNow that enhances the traditional error logging by providing more detailed information about the error. Unlike Error(), NiceError() offers a track of the execution, including stack traces and function calls. This additional context is invaluable when debugging, as it helps developers quickly pinpoint the source of the issue.
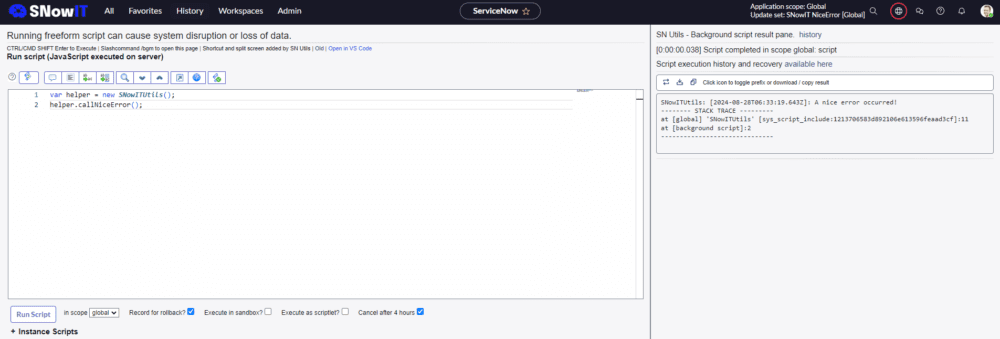
The output from NiceError() includes not only the error message but also a stack trace, providing a clearer picture of the error’s context. This makes NiceError() a powerful tool for developers, enabling more efficient debugging and faster issue resolution.
Why Switch to NiceError()?
Switching to NiceError() offers several significant benefits:
- Enhanced Debugging: By providing a complete execution trace,
NiceError()makes it easier to understand the sequence of events leading up to the error. This can be especially helpful in complex scripts where multiple functions and processes are involved. - Improved Maintenance: Detailed error information enables faster troubleshooting, reducing the time it takes to identify and fix issues. This leads to a more stable application and a better overall user experience.
- Scalability: As your application grows and becomes more complex, having robust error tracking becomes crucial.
NiceError()scales well with your application’s needs, providing the detailed information necessary to maintain control.
Getting Started with NiceError()
Implementing NiceError() in your ServiceNow instance is straightforward. Here are the steps to get started:
- Identify Critical Error Points: Review your existing scripts and workflows to identify where errors commonly occur. These are prime candidates for using
NiceError(). - Replace
Error()withNiceError(): In your identified scripts, replace instances ofError()withNiceError(). This involves adjusting the catch blocks to handle and log the additional context provided byNiceError(). - Log and Monitor Errors: Use ServiceNow’s logging capabilities to capture and store the detailed error information provided by
NiceError(). Regularly monitor these logs to identify and address issues proactively. - Train Your Team: Ensure that your development and support teams are familiar with
NiceError()and understand how to interpret the additional information it provides. This will help them troubleshoot issues more effectively.
Best Practices for Using NiceError()
To get the most out of NiceError(), consider the following best practices:
- Log Meaningful Messages: Make sure your error messages are descriptive and provide context. This will make it easier to understand what went wrong and why.
- Avoid Overuse: While
NiceError()is powerful, avoid using it excessively, as this can clutter your logs and make it harder to find relevant information. Use it strategically where detailed tracking is most needed. - Combine with Other Debugging Tools: Use
NiceError()in conjunction with other ServiceNow debugging tools to gain a comprehensive understanding of application issues.
Conclusion
Effective error handling is critical for maintaining the stability and reliability of your ServiceNow applications. By transitioning from the traditional Error() function to the more informative NiceError(), you can gain deeper insights into application issues, enabling faster and more efficient troubleshooting. Start using NiceError() today to enhance your error handling and ensure your applications run smoothly.
Call to Action
Ready to take your error handling to the next level? Start using NiceError() in your ServiceNow scripts and experience the benefits of enhanced error tracking and debugging. Have you already used NiceError()? Don’t forget to subscribe to our Youtube’s channel for more ServiceNow tips and updates.
ServiceNow Platform Analytics Workspace – Inline editor tutorial
Wstęp
W stale ewoluującym krajobrazie zarządzania usługami IT, zdolność do efektywnej wizualizacji danych jest kluczowa. Nowy pulpit Platform Analytics w ServiceNow oferuje solidne rozwiązanie do tworzenia intuicyjnych i potężnych pulpitów nawigacyjnych. W tym przewodniku przeprowadzimy Cię przez proces konfiguracji pulpitów przy użyciu interfejsu drag&drop (in-line editor).
Przegląd Platform Analytics Workspace
Platform Analytics w ServiceNow wprowadza nowy poziom funkcjonalności i przyjazności użytkownikowi w tworzeniu pulpitów nawigacyjnych. Ta sekcja zapewni przegląd kluczowych funkcji i korzyści tego potężnego narzędzia.
Kluczowe funkcje:
- Intuicyjny interfejs drag-and-drop
- Zaawansowane opcje dostosowywania
- Płynna integracja danych
- Analizy i raportowanie w czasie rzeczywistym
Korzyści:
- Ulepszone podejmowanie decyzji dzięki wizualizacji danych w czasie rzeczywistym
- Zwiększona wygoda użytkowania dzięki dostosowywanym pulpitom nawigacyjnym
- Zwiększona efektywność monitorowania i analizy wydajności usług IT
Tworzenie pulpitów nawigacyjnych za pomocą Drag-and-Drop
Jedną z wyróżniających się funkcji przestrzeni Platform Analytics jest funkcjonalność drag-and-drop. W załączonym filmie przeprowadzimy Cię przez kroki tworzenia podstawowego pulpitu nawigacyjnego.
Przewodnik krok po kroku:
Krok 1: Przejdź do przestrzeni Platform Analytics.
Krok 2: Wybierz „Utwórz nowy pulpit nawigacyjny”.
Krok 3: Użyj interfejsu drag-and-drop, aby dodać widżety do swojego pulpitu nawigacyjnego.
Krok 4: Dostosuj właściwości widżetów, takie jak źródła danych i ustawienia wyświetlania.
Krok 5: Zapisz i podglądaj swój pulpit nawigacyjny.
Wskazówki:
- Używaj różnych widżetów, aby uchwycić różne punkty danych.
- Organizuj widżety logicznie, aby stworzyć spójny i intuicyjny układ.
- Regularnie aktualizuj swoje źródła danych, aby zapewnić dokładne raportowanie.
Podsumowanie
Konfiguracja pulpitów nawigacyjnych w nowej przestrzeni Platform Analytics w ServiceNow może znacznie zwiększyć Twoją zdolność do monitorowania, analizowania i reagowania na dane usług IT. Wykorzystując zarówno interfejs drag-and-drop, jak i zaawansowane opcje dostosowywania, możesz tworzyć pulpity nawigacyjne, które spełniają Twoje unikalne potrzeby.
Ponieważ ServiceNow przenosi wszystkie funkcje raportowania i analiz wydajności do Platform Analytics w wersji Zurich, teraz jest najlepszy czas, aby skorzystać z tych potężnych narzędzi. Odkryj samouczki SNowIT, aby być na bieżąco i w pełni wykorzystać te nowe funkcje. Zacznij tworzyć swój pierwszy pulpit nawigacyjny już dziś i podnieś swoje możliwości wizualizacji danych na wyższy poziom.
Mastering UI Action Button Migration: A Comprehensive Guide for ServiceNow Workspace
Introduction
In the realm of enterprise solutions, ServiceNow stands tall as a powerful platform that streamlines workflows and enhances productivity. With its recent introduction of the Workspace interface, ServiceNow has taken a significant leap forward in modernizing the user experience. However, for organizations accustomed to the traditional standard UI, migrating UI Action buttons to the Workspace can be a daunting task. Fear not, as we’ve prepared a comprehensive guide to walk you through this transition seamlessly.
Understanding the Significance
UI Action buttons serve as essential tools within ServiceNow, enabling users to perform various actions with a single click. With the introduction of Workspace, it becomes imperative to migrate these buttons to ensure continuity and efficiency in workflows. Failure to do so may result in disjointed user experiences and decreased productivity.
Key Differences Between Standard UI and Workspace
Before delving into the migration process, it’s essential to understand the differences between the standard UI and Workspace interfaces. Workspace offers a more modern, intuitive user experience with enhanced navigation and functionality. Migrating UI Action buttons ensures that users can leverage these benefits seamlessly.
Step-by-Step Migration Process
- Assess Your UI Action Buttons: Begin by identifying all UI Action buttons currently in use within your ServiceNow instance.
- Evaluate Compatibility: Determine if your existing buttons are compatible with both standard UI and Workspace. If not, consider making necessary adjustments.
- Custom Button Creation: Create custom buttons with simple functions that work across both interfaces. This ensures consistency and compatibility.
- Aligning with Out-of-the-Box Buttons: Properly align your custom buttons with out-of-the-box buttons within the Workspace interface for a cohesive user experience.
- Configuration and Testing: Configure the buttons within ServiceNow, ensuring they function correctly in both standard UI and Workspace environments.
- User Training and Feedback: Provide training to users on the new Workspace interface and gather feedback to make any necessary refinements.
Best Practices and Tips
- Prioritize user experience and consistency across interfaces.
- Test thoroughly in sandbox environments before deploying changes to production.
- Communicate changes effectively to users and provide ongoing support.
Conclusion
Migrating UI Action buttons to ServiceNow Workspace is a crucial step in maximizing the benefits of the platform’s modern interface. By following our comprehensive guide, you can ensure a smooth transition, enhance user experience, and unlock the full potential of ServiceNow’s capabilities.
Stay tuned for more insights and tips on optimizing your ServiceNow experience. Subscribe to our blog for regular updates and industry insights.
Script Include:
var SNowitSOWAjaxUtils = Class.create();
SNowitSOWAjaxUtils.prototype = Object.extendsObject(AbstractAjaxProcessor, {
    /*
    Function that returns DisplayName and SysID of the Group Members
    @param {String} group_id - SysID of the Group
    Return {Object} - Returns object as {displayName {String}, sys_id {String}}
    */
    GetGroupMembers: function(group_id) {
        var groupID = this.getParameter('group_id') || group_id;
        var result = []; // [{displayName, sys_id}]
        if (groupID) {
            var memGR = new GlideRecord('sys_user_grmember');
            memGR.addQuery('group', groupID);
            memGR.orderBy('email');
            memGR.query();
            while (memGR.next()) {
                var temp = {};
                temp.displayName = memGR.getDisplayValue('user');
                temp.sys_id = memGR.getValue('user');
                if (temp.sys_id)
                    result.push(temp);
            }
        }
        return JSON.stringify(result);
    },
    type: 'SNowitSOWAjaxUtils'
});
Workspace Client Script:
function onClick(g_form) {
    var groupID = g_form.getValue('assignment_group');
    var ga = new GlideAjax("SNowitSOWAjaxUtils");
    ga.addParam("sysparm_name", "GetGroupMembers");
    ga.addParam("group_id", groupID);
    ga.getXMLAnswer(function(response) {
        try {
            answer = JSON.parse(response);
        } catch (e) {
            return;
        }
        if (groupID && !g_form.getValue('assigned_to')) {
            var choices = [];
            for (var i = 0; i < answer.length; i++) {
                choices.push({
                    displayValue: answer[i].displayName,
                    value: answer[i].sys_id,
                });
            }
            g_modal.showFields({
                title: 'Select Assigned to and move to Assess',
                cancelTitle: 'Cancel',
                confirmTitle: 'Assign',
                cancelType: 'default',
                size: 'md',
                confirmType: 'confirm',
                fields: [{
                    type: 'choice',
                    name: 'assigned_to',
                    label: 'Assigned to',
                    choices: choices,
                    mandatory: true
                }],
            }).then(function(fieldValues) {
                g_form.setValue('assigned_to', fieldValues.updatedFields[0].value);
                g_form.setValue('state', '102');
                g_form.save();
            });
        }
    });
}
Odblokuj potencjał ukrytych funkcji we Flow Designerze dla Inbound Emails
Wprowadzenie
Wyzwalacze Flow Inbound Email w ServiceNow oferują potężny sposób na automatyzację procesów, usprawnienie komunikacji i zwiększenie efektywności. Jednak domyślnie pewne funkcjonalności, takie jak zarządzanie kolejnością wykonywania i zatrzymywanie dalszego przetwarzania po pierwszym wyzwalaczu, są ukryte. W tym przewodniku przeprowadzimy Cię przez proces odblokowania tych możliwości, aby maksymalnie wykorzystać potencjał wyzwalaczy Flow Inbound Email.
Włączenie zaawansowanych opcji
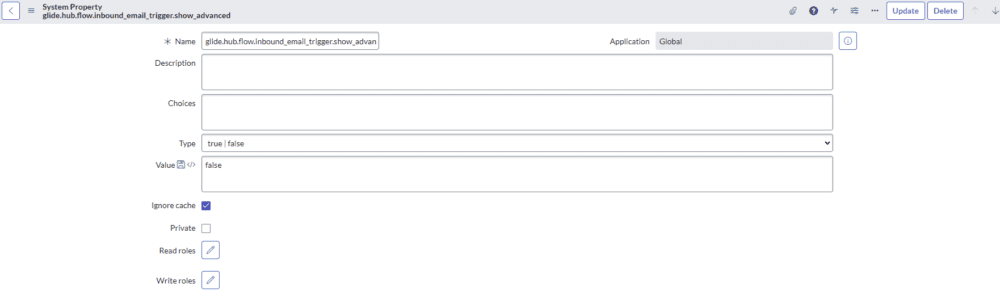
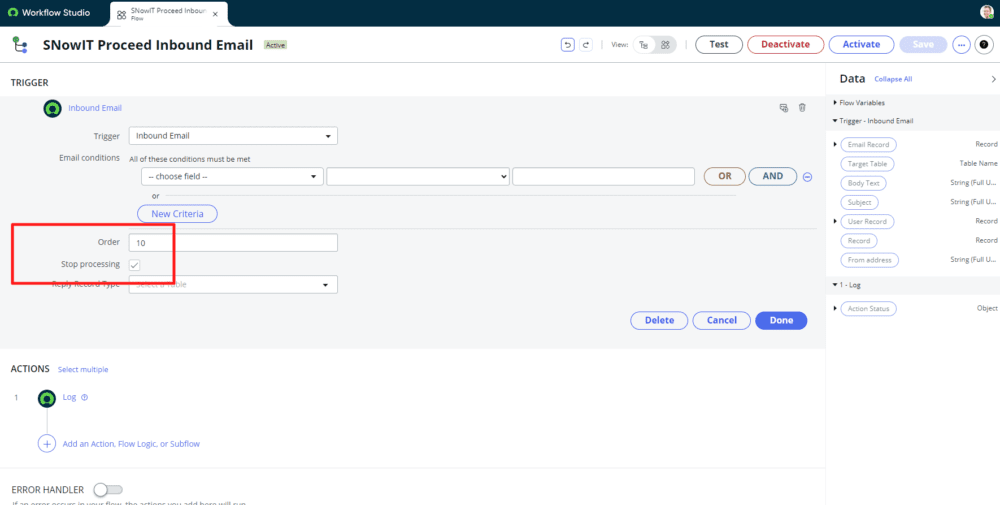
Aby uzyskać dostęp do zaawansowanych funkcji dla wyzwalaczy Flow Inbound Email w ServiceNow, musimy włączyć określoną właściwość. Właściwość ta nosi nazwę 'glide.hub.flow.inbound_email_trigger.show_advanced’ i jest typu True/False. Ustawiając tę właściwość na True, odblokowujemy pola wejściowe Kolejność i Zatrzymaj przetwarzanie, co pozwala nam zarządzać kolejnością wykonania i kontrolować dalsze przetwarzanie wyzwalanych przepływów.
Konfiguracja
- Przejdź do instancji ServiceNow i zaloguj się na konto administratora.
- Przejdź do Właściwości systemowe, wyszukując „Właściwości systemowe” w przeglądarce filtrów.
- Zlokalizuj właściwość o nazwie 'glide.hub.flow.inbound_email_trigger.show_advanced’.
- Ustaw wartość tej właściwości na True, aby włączyć zaawansowane opcje dla wyzwalaczy Flow Inbound Email.
- Zapisz dokonane zmiany.
Zarządzanie kolejką egzekucji
Po włączeniu zaawansowanych opcji, zauważysz dwa dodatkowe pola wyboru podczas konfigurowania wyzwalaczy Flow Inbound Email:
- Order: To pole wyboru pozwala określić kolejność wykonywania wielu wyzwalaczy przychodzących wiadomości e-mail. Domyślnie ServiceNow przetwarza wyzwalacze w kolejności ich utworzenia. Jednakże, dzięki tej opcji, możesz priorytetyzować wyzwalacze zgodnie z wymaganiami swojego procesu roboczego.
- Stop Processing: Włączenie tego pola wyboru sprawia, że po aktywowaniu wyzwalacza i wykonaniu związanej z nim operacji, dalsze przetwarzanie zostaje zatrzymane. Zapobiega to aktywacji kolejnych wyzwalaczy, co zapewnia większą kontrolę nad przepływem działań.
Praktyczne wdrożenie
Rozważmy scenariusz, w którym konfigurowane są multiple wyzwalacze Flow Inbound Email do obsługi różnych rodzajów żądań e-mailowych. Poprzez włączenie zaawansowanych opcji i skonfigurowanie kolejności wykonania, możesz zapewnić, że procesy krytyczne zostaną obsłużone jako pierwsze, a mniej pilne jako kolejne. Dodatkowo, możliwość zatrzymania przetwarzania po aktywacji pierwszego wyzwalacza może zapobiec duplikowaniu działań i usprawnić efektywność przepływu pracy.
Podsumowanie
Odblokowanie zaawansowanych opcji dla wyzwalaczy Flow Inbound Email w ServiceNow umożliwia pełną kontrolę nad procesami automatyzacji. Poprzez włączenie pól Kolejność i Zatrzymaj przetwarzanie, możesz zarządzać kolejnością wykonania i zapobiec zbędnym działaniom, co ostatecznie zwiększa efektywność Twojej instancji ServiceNow. Wypróbuj te funkcje, aby zoptymalizować przepływy pracy i zwiększyć produktywność w swojej organizacji.
W SNowIT, zobowiązujemy się pomagać Ci wykorzystać pełny potencjał ServiceNow, aby usprawnić swoje operacje i osiągnąć cele biznesowe. Bądźcie na bieżąco z kolejnymi cennymi wskazówkami i samouczkami dotyczącymi maksymalizacji doświadczenia z ServiceNow.
Weryfikacja wprowadzanych dat w ServiceNow Washington: Poradnik
Wprowadzenie
Wraz z używaniem platformy ServiceNow zapewnienie dokładnych walidacji dat w Catalog Item’ach jest niezmiernie ważne dla efektywnego zarządzania przepływem pracy. W tym przewodniku zgłębimy różne metody walidacji dat po stronie klienta przy użyciu akcji oraz skryptowania, wykorzystując zarówno najnowsze funkcje, jak i tradycyjne podejścia.
Catalog UI Policy z nową funkcjonalnością w Wersji Washington
Z nadejściem wersjiWashington, ServiceNow wprowadza zaawansowane możliwości w ramach Catalog UI Policy. Teraz możesz bezproblemowo stosować walidacje dat za pomocą ulepszonych UI Policy Actions. Oto jak możesz wykorzystać tę funkcję do walidacji dat w Catalog Item’ach.
Zacznij od skonfigurowania Catalog UI Policy dostosowanej do Twoich konkretnych potrzeb. Wykorzystaj nową funkcję UI Policy Action do ustawiania wartości pola (Value Action) i dynamicznego wyświetlania niestandardowych komunikatów (Field Message). Na przykład, możesz zagwarantować, że daty takie jak data rozpoczęcia i data zakończenia nie mogą być w przeszłości, a data rozpoczęcia musi poprzedzać datę zakończenia. Dzięki temu intuicyjnemu interfejsowi administratorzy mogą łatwo stosować zasady walidacji dat bez konieczności skomplikowanego skryptowania.
Catalog UI Policy z tradycyjnym skryptowaniem
Dla tych, którzy wolą bardziej praktyczne podejście, Catalog UI Policy w ServiceNow nadal uwzględnia tradycyjne metody skryptowania do walidacji dat. Choć podejście to może wymagać nieco więcej wprawy w kodowaniu, zapewnia ono szczegółową kontrolę nad logiką walidacji.
Poprzez tworzenie skryptów po stronie klienta w ramach UI Policy, administratorzy mogą ustawiać wartości pól i wyświetlać niestandardowe komunikaty na podstawie skomplikowanych reguł walidacji dat. Choć ta metoda może być uważana za „staromodną” (w odniesieniu do możliwości użycia UI Policy Action w wersji Washington), nadal stanowi solidną opcję dla tych, którzy czują się komfortowo ze skryptowaniem.
Catalog Client Script zaawansowane porównania
W sytuacjach, gdy konieczne jest bardziej zaawansowane porównywanie dat, możesz wykorzystać Catalog Client Script’y. Te skrypty pozwalają administratorom radzić sobie z złożonymi scenariuszami, które obejmują wiele dat, jednocześnie bezproblemowo dostosowując się do zdefiniowanych przez użytkownika formatów dat.
Wykorzystując Skrypty klienta katalogu, administratorzy mogą łatwo pobierać formaty dat użytkownika i dynamicznie dostosowywać logikę walidacji. Zapewnia to bezproblemowe doświadczenie użytkownika przy jednoczesnym zachowaniu surowych zasad walidacji dat w całym katalogu.
Wnioski
Opanowanie walidacji dat w ServiceNow jest kluczowe dla usprawnienia procesów przepływu pracy i utrzymania integralności danych. Bez względu na to, czy wybierzesz intuicyjne Catalog UI Polocy Action, tradycyjne metody skryptowania czy zaawansowane Client Script’y, ServiceNow oferuje wszechstronny zestaw narzędzi, aby sprostać Twoim potrzebom. Poprzez skuteczne wykorzystanie tych narzędzi administratorzy mogą zapewnić płynne działanie i zwiększyć satysfakcję użytkowników w swoim środowisku ServiceNow.