ServiceNow: Scripted REST API with API Key
Introduction
Setting up API key authentication for scripted REST APIs in ServiceNow can streamline your integration and ensure secure access to your APIs. This guide will walk you through each step, from setting up an authentication profile to testing the integration. By following these steps, you’ll have a secure and well-configured API key authentication process ready for use with your ServiceNow REST APIs.
Step 1: Set Up an Authentication Profile
To begin, configure an authentication profile in ServiceNow to manage how your API keys are processed.
- Navigate to the Inbound Authentication Profile Section: Go to System Web Services > API Access Policies > Inbound Authentication Profile in your ServiceNow instance.
- Create an API Key Authentication Profile:
- Select the option to create a new profile dedicated to API Key authentication.
- Define the appropriate authorization parameter. Typically, you can set this to authorize users via the Auth header or Query parameter, depending on the level of security required by your integration.
Choosing the Auth header ensures that sensitive information is not exposed in the URL, which is generally recommended for added security. Alternatively, if you prefer a simpler setup, using the Query parameter is another option, though slightly less secure.
Step 2: Set Up an API Key
The next step involves creating the actual API key that will be used for authentication.
- Navigate to the REST API Key Section: Go to System Web Services > API Access Policies > REST API Key.
- Create a New API Key:
- Define a Name for the API key that is easily identifiable for future reference.
- Select the User who will have access to this API key. This user should have the appropriate permissions to interact with the specified REST APIs.
- Copy the Token generated for this key. The token is a unique identifier for API access and will be used in the authorization part of your API calls. Ensure that this token is stored securely, as it provides direct access to your REST APIs.
Step 3: Configure an API Access Policy
With the API key created, you need to configure an access policy to control the conditions under which the API key can access your scripted REST APIs.
- Navigate to REST API Access Policies: Go to System Web Services > API Access Policies > REST API Access Policies.
- Create a New API Access Policy:
- Define a Name for the access policy that reflects its purpose.
- Select the REST API (specifically, the scripted REST API) that this policy will apply to.
- Configure additional attributes as needed, such as whether the policy should Apply to all methods (e.g., GET, POST, PUT, DELETE) and any other conditions relevant to your setup. Customizing these attributes ensures that the access policy fits the intended use case and restricts API key usage as needed.
Step 4: Test the Integration
Now that your API key and access policy are configured, it’s essential to test the integration and verify that everything is working as expected.
- Test the API Key Authentication: Use your dedicated API token (generated in Step 2) and insert it in the manner specified in your authentication profile—either in the x-sn-apikey header or as a query parameter, depending on the setup.
- Verify Successful Authentication:
- Send a request to your scripted REST API with the API key. Confirm that the request is successfully authenticated using the API key token.
- Check that the API responses are returned as expected and that no authentication errors occur.
- If there are any issues, double-check the access policy settings and the way the API key is passed in the request headers or parameters.
Conclusion
Setting up API key authentication for scripted REST APIs in ServiceNow enhances security and provides a reliable means to control access. By carefully following these steps—configuring an authentication profile, creating an API key, setting up an API access policy, and testing the integration—you’ll establish a secure foundation for managing API access. This setup also gives you the flexibility to adjust permissions, ensuring your APIs are accessed securely and as intended.
By implementing this API key authentication method, you’ll be well-prepared for secure ServiceNow REST API interactions, allowing authorized users to integrate with confidence.
Enhancing Error Handling in ServiceNow: The Power of NiceError()
Introduction
In the ever-evolving world of IT service management, ServiceNow continues to innovate and provide developers with powerful tools to enhance system performance and reliability. One of the critical aspects of robust application development is effective error handling. Traditionally, ServiceNow developers have relied on the Error() function to capture and display error messages. However, with the introduction of NiceError(), there’s a new, more informative way to handle errors that offers deeper insights into application issues. In this post, we will explore the transition from Error() to NiceError() and discuss how this change can improve your debugging and troubleshooting processes.
Why Error Handling Matters
Error handling is a fundamental aspect of software development. It ensures that applications can gracefully handle unexpected situations, provide useful feedback, and maintain stability. Effective error handling helps developers identify the root cause of issues quickly, minimizing downtime and improving user experience. In complex platforms like ServiceNow, where multiple processes and integrations are in play, having robust error handling mechanisms is essential to maintain the integrity and reliability of the system.
The Limitations of Error()
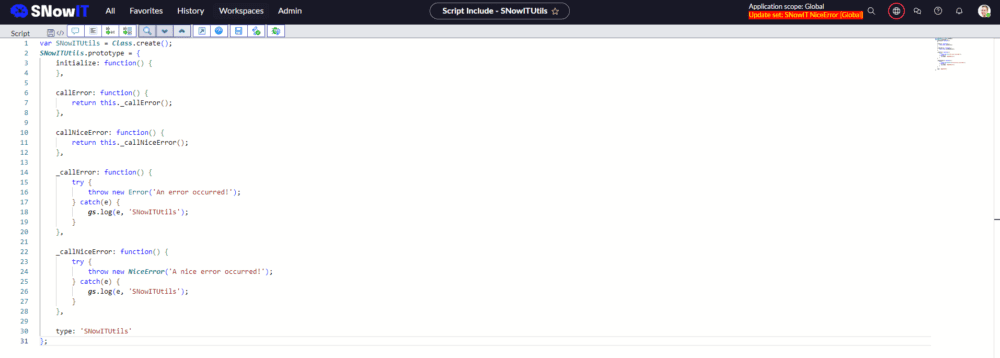
The traditional Error() function in ServiceNow has been a staple for logging error messages. While it serves its purpose by alerting developers to issues, it falls short in providing the full context needed to understand and resolve the problem efficiently. Typically, Error() will log a basic error message, which might look something like this:

The output, in this case, is just the error message “An error occurred!” without any additional information about where or why the error happened. This lack of detail can make troubleshooting more challenging, especially in complex scripts or workflows.
Introducing NiceError()
Enter NiceError(), a new error handling method in ServiceNow that enhances the traditional error logging by providing more detailed information about the error. Unlike Error(), NiceError() offers a track of the execution, including stack traces and function calls. This additional context is invaluable when debugging, as it helps developers quickly pinpoint the source of the issue.
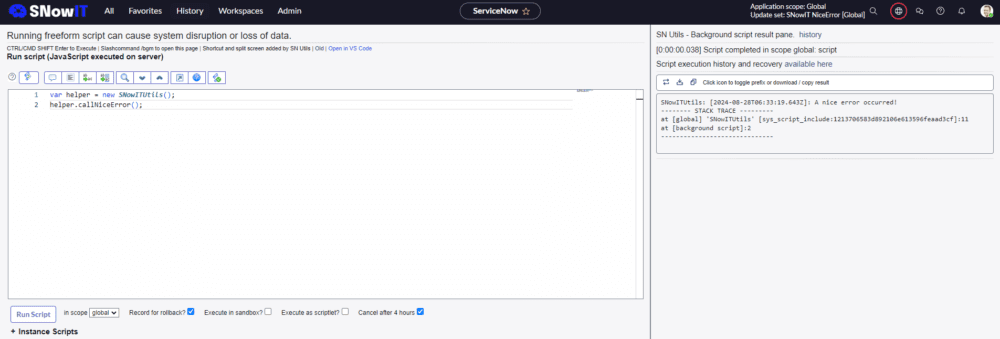
The output from NiceError() includes not only the error message but also a stack trace, providing a clearer picture of the error’s context. This makes NiceError() a powerful tool for developers, enabling more efficient debugging and faster issue resolution.
Why Switch to NiceError()?
Switching to NiceError() offers several significant benefits:
- Enhanced Debugging: By providing a complete execution trace,
NiceError()makes it easier to understand the sequence of events leading up to the error. This can be especially helpful in complex scripts where multiple functions and processes are involved. - Improved Maintenance: Detailed error information enables faster troubleshooting, reducing the time it takes to identify and fix issues. This leads to a more stable application and a better overall user experience.
- Scalability: As your application grows and becomes more complex, having robust error tracking becomes crucial.
NiceError()scales well with your application’s needs, providing the detailed information necessary to maintain control.
Getting Started with NiceError()
Implementing NiceError() in your ServiceNow instance is straightforward. Here are the steps to get started:
- Identify Critical Error Points: Review your existing scripts and workflows to identify where errors commonly occur. These are prime candidates for using
NiceError(). - Replace
Error()withNiceError(): In your identified scripts, replace instances ofError()withNiceError(). This involves adjusting the catch blocks to handle and log the additional context provided byNiceError(). - Log and Monitor Errors: Use ServiceNow’s logging capabilities to capture and store the detailed error information provided by
NiceError(). Regularly monitor these logs to identify and address issues proactively. - Train Your Team: Ensure that your development and support teams are familiar with
NiceError()and understand how to interpret the additional information it provides. This will help them troubleshoot issues more effectively.
Best Practices for Using NiceError()
To get the most out of NiceError(), consider the following best practices:
- Log Meaningful Messages: Make sure your error messages are descriptive and provide context. This will make it easier to understand what went wrong and why.
- Avoid Overuse: While
NiceError()is powerful, avoid using it excessively, as this can clutter your logs and make it harder to find relevant information. Use it strategically where detailed tracking is most needed. - Combine with Other Debugging Tools: Use
NiceError()in conjunction with other ServiceNow debugging tools to gain a comprehensive understanding of application issues.
Conclusion
Effective error handling is critical for maintaining the stability and reliability of your ServiceNow applications. By transitioning from the traditional Error() function to the more informative NiceError(), you can gain deeper insights into application issues, enabling faster and more efficient troubleshooting. Start using NiceError() today to enhance your error handling and ensure your applications run smoothly.
Call to Action
Ready to take your error handling to the next level? Start using NiceError() in your ServiceNow scripts and experience the benefits of enhanced error tracking and debugging. Have you already used NiceError()? Don’t forget to subscribe to our Youtube’s channel for more ServiceNow tips and updates.
New ServiceNow Platform Analytics Workspace – Guide for Inline editor
Introduction
In the ever-evolving landscape of IT service management, the ability to visualize data effectively is crucial. ServiceNow’s new Platform Analytics workspace offers a robust solution for creating intuitive and powerful dashboards. In this guide, we’ll walk you through the process of setting up dashboards using drag&drop interface (in-line editor).
Overview of the Platform Analytics Workspace
ServiceNow’s Platform Analytics workspace brings a new level of functionality and user-friendliness to dashboard creation. This section will provide an overview of the key features and benefits of this powerful tool.
Key Features:
- Intuitive drag-and-drop interface
- Advanced customization options
- Seamless data integration
- Real-time analytics and reporting
Benefits:
- Improved decision-making through real-time data visualization
- Enhanced user experience with customizable dashboards
- Increased efficiency in monitoring and analyzing IT service performance
Creating Dashboards with Drag-and-Drop
One of the standout features of the Platform Analytics workspace is its drag-and-drop functionality. In the attached video we will guide you through the steps to create a basic dashboard.
Step-by-Step Guide:
- Step 1: Navigate to the Platform Analytics workspace.
- Step 2: Select ‘Create New Dashboard.’
- Step 3: Use the drag-and-drop interface to add widgets to your dashboard.
- Step 4: Customize widget properties, such as data sources and display settings.
- Step 5: Save and preview your dashboard.
Tips:
- Use a variety of widgets to capture different data points.
- Organize widgets logically to create a coherent and intuitive layout.
- Regularly update your data sources to ensure accurate reporting.
Conclusion
Setting up dashboards in the new Platform Analytics workspace in ServiceNow can significantly enhance your ability to monitor, analyze, and act on IT service data. By leveraging both the drag-and-drop interface and advanced customization options, you can create dashboards that meet your unique needs.
As ServiceNow is moving all reports and performance analytics features to Platform Analytics in the Zurich version, now is the best time to take advantage of these powerful tools. Explore SNowIT’s tutorials to stay ahead and fully utilize these new features. Start creating your first dashboard today and elevate your data visualization capabilities to the next level.
Mastering UI Action Button Migration: A Comprehensive Guide for ServiceNow Workspace
Introduction
In the realm of enterprise solutions, ServiceNow stands tall as a powerful platform that streamlines workflows and enhances productivity. With its recent introduction of the Workspace interface, ServiceNow has taken a significant leap forward in modernizing the user experience. However, for organizations accustomed to the traditional standard UI, migrating UI Action buttons to the Workspace can be a daunting task. Fear not, as we’ve prepared a comprehensive guide to walk you through this transition seamlessly.
Understanding the Significance
UI Action buttons serve as essential tools within ServiceNow, enabling users to perform various actions with a single click. With the introduction of Workspace, it becomes imperative to migrate these buttons to ensure continuity and efficiency in workflows. Failure to do so may result in disjointed user experiences and decreased productivity.
Key Differences Between Standard UI and Workspace
Before delving into the migration process, it’s essential to understand the differences between the standard UI and Workspace interfaces. Workspace offers a more modern, intuitive user experience with enhanced navigation and functionality. Migrating UI Action buttons ensures that users can leverage these benefits seamlessly.
Step-by-Step Migration Process
- Assess Your UI Action Buttons: Begin by identifying all UI Action buttons currently in use within your ServiceNow instance.
- Evaluate Compatibility: Determine if your existing buttons are compatible with both standard UI and Workspace. If not, consider making necessary adjustments.
- Custom Button Creation: Create custom buttons with simple functions that work across both interfaces. This ensures consistency and compatibility.
- Aligning with Out-of-the-Box Buttons: Properly align your custom buttons with out-of-the-box buttons within the Workspace interface for a cohesive user experience.
- Configuration and Testing: Configure the buttons within ServiceNow, ensuring they function correctly in both standard UI and Workspace environments.
- User Training and Feedback: Provide training to users on the new Workspace interface and gather feedback to make any necessary refinements.
Best Practices and Tips
- Prioritize user experience and consistency across interfaces.
- Test thoroughly in sandbox environments before deploying changes to production.
- Communicate changes effectively to users and provide ongoing support.
Conclusion
Migrating UI Action buttons to ServiceNow Workspace is a crucial step in maximizing the benefits of the platform’s modern interface. By following our comprehensive guide, you can ensure a smooth transition, enhance user experience, and unlock the full potential of ServiceNow’s capabilities.
Stay tuned for more insights and tips on optimizing your ServiceNow experience. Subscribe to our blog for regular updates and industry insights.
Script Include:
var SNowitSOWAjaxUtils = Class.create();
SNowitSOWAjaxUtils.prototype = Object.extendsObject(AbstractAjaxProcessor, {
    /*
    Function that returns DisplayName and SysID of the Group Members
    @param {String} group_id - SysID of the Group
    Return {Object} - Returns object as {displayName {String}, sys_id {String}}
    */
    GetGroupMembers: function(group_id) {
        var groupID = this.getParameter('group_id') || group_id;
        var result = []; // [{displayName, sys_id}]
        if (groupID) {
            var memGR = new GlideRecord('sys_user_grmember');
            memGR.addQuery('group', groupID);
            memGR.orderBy('email');
            memGR.query();
            while (memGR.next()) {
                var temp = {};
                temp.displayName = memGR.getDisplayValue('user');
                temp.sys_id = memGR.getValue('user');
                if (temp.sys_id)
                    result.push(temp);
            }
        }
        return JSON.stringify(result);
    },
    type: 'SNowitSOWAjaxUtils'
});
Workspace Client Script:
function onClick(g_form) {
    var groupID = g_form.getValue('assignment_group');
    var ga = new GlideAjax("SNowitSOWAjaxUtils");
    ga.addParam("sysparm_name", "GetGroupMembers");
    ga.addParam("group_id", groupID);
    ga.getXMLAnswer(function(response) {
        try {
            answer = JSON.parse(response);
        } catch (e) {
            return;
        }
        if (groupID && !g_form.getValue('assigned_to')) {
            var choices = [];
            for (var i = 0; i < answer.length; i++) {
                choices.push({
                    displayValue: answer[i].displayName,
                    value: answer[i].sys_id,
                });
            }
            g_modal.showFields({
                title: 'Select Assigned to and move to Assess',
                cancelTitle: 'Cancel',
                confirmTitle: 'Assign',
                cancelType: 'default',
                size: 'md',
                confirmType: 'confirm',
                fields: [{
                    type: 'choice',
                    name: 'assigned_to',
                    label: 'Assigned to',
                    choices: choices,
                    mandatory: true
                }],
            }).then(function(fieldValues) {
                g_form.setValue('assigned_to', fieldValues.updatedFields[0].value);
                g_form.setValue('state', '102');
                g_form.save();
            });
        }
    });
}
Unlocking the Power of Flow Inbound Email Triggers in ServiceNow
Introduction
Flow Inbound Email triggers in ServiceNow offer a powerful way to automate processes, streamline communication, and enhance efficiency. However, out of the box, certain functionalities like managing execution order and stopping further processing after the first trigger are hidden. In this guide, we’ll walk you through the process of unlocking these capabilities to maximize the potential of Flow Inbound Email triggers.
Enabling Advanced Options
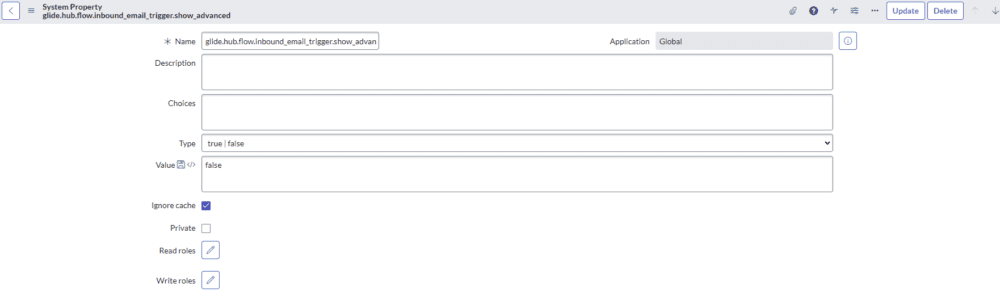
To gain access to the advanced features for Flow Inbound Email triggers in ServiceNow, we need to enable a specific property. The property is named ‘glide.hub.flow.inbound_email_trigger.show_advanced‘ and is of type True/False. By setting this property to True, we can unlock the Order and Stop Processing input fields, allowing us to manage the execution order and control further processing of triggered flows.
Here’s how to do it
- Navigate to the ServiceNow instance and log in with administrative privileges.
- Go to System Properties by searching for ‘System Properties’ in the filter navigator.
- Locate the property named ‘glide.hub.flow.inbound_email_trigger.show_advanced‘.
- Set the value of this property to True to enable the advanced options for Flow Inbound Email triggers.
- Save the changes.
Managing Execution Order
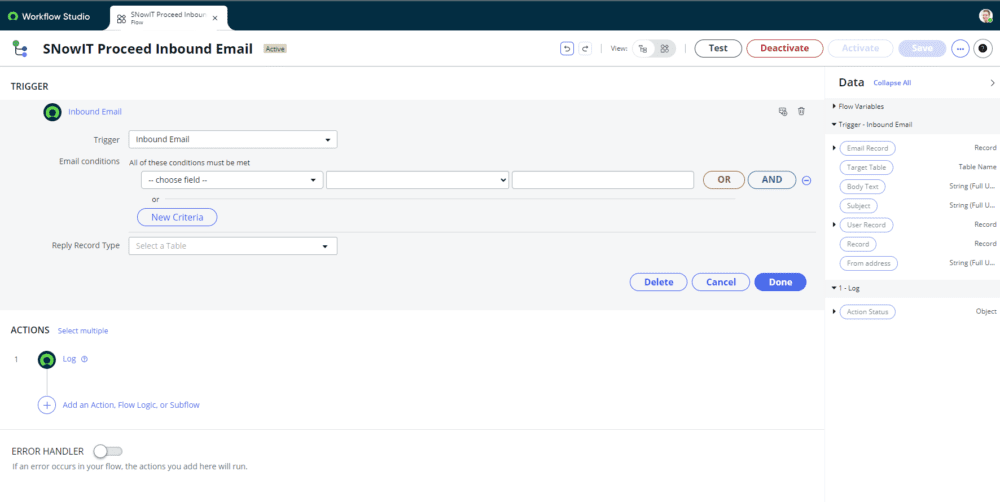
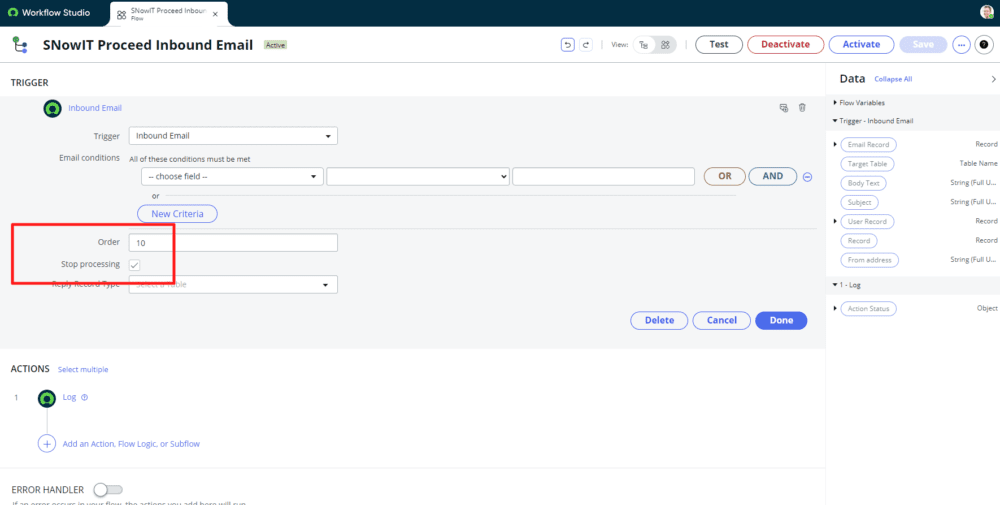
Once the advanced options are enabled, you’ll notice two additional checkboxes when configuring Flow Inbound Email triggers: Order and Stop Processing.
- Order: This checkbox allows you to specify the execution order of multiple inbound email triggers. By default, ServiceNow processes triggers in the order they were created. However, with this option enabled, you can prioritize triggers based on your workflow requirements.
- Stop Processing: Enabling this checkbox ensures that once a trigger is activated and its associated flow executed, further processing stops. This prevents subsequent triggers from being activated, providing more control over the flow of actions.
Practical Implementation
Let’s consider a scenario where multiple Flow Inbound Email triggers are set up to handle different types of email requests. By enabling the advanced options and configuring the execution order, you can ensure that critical processes are handled first, followed by less urgent ones. Additionally, the ability to stop processing after the first trigger is activated can prevent duplicate actions and streamline workflow efficiency.
Conclusion
Unlocking the advanced options for Flow Inbound Email triggers in ServiceNow empowers you to take full control of your automation processes. By enabling the Order and Stop Processing inputs, you can manage execution order and prevent redundant actions, ultimately enhancing the effectiveness of your ServiceNow instance. Experiment with these features to optimize your workflows and drive greater productivity across your organization.
At SNowIT, we’re committed to helping you leverage the full potential of ServiceNow to streamline your operations and achieve your business objectives. Stay tuned for more insightful tips and tutorials on maximizing your ServiceNow experience.
Mastering Date Validation in ServiceNow Washington: A Comprehensive Guide
Introduction
In the realm of ServiceNow Washington, ensuring accurate date validations in your catalog items is paramount for efficient workflow management. In this guide, we’ll explore various methods to validate dates using client-side actions and scripting, leveraging the latest features and traditional approaches alike.
Catalog UI Policy with New Washington Features
With the advent of Washington, ServiceNow introduces advanced capabilities within Catalog UI Policies. Now, you can seamlessly enforce date validations with enhanced UI Policy Actions. Let’s dive into how you can leverage this feature to validate dates in your catalog items.
Start by configuring a Catalog UI Policy tailored to your specific needs. Utilize the new UI Policy Action feature to set field values and display custom messages dynamically. For instance, you can ensure that dates such as start date and end date cannot be in the past, and the start date must precede the end date. With this intuitive interface, administrators can effortlessly enforce date validation rules without complex scripting.
Catalog UI Policy with Traditional Scripting
For those who prefer a more hands-on approach, ServiceNow’s Catalog UI Policy still accommodates traditional scripting methods to validate dates. While this approach may require a bit more coding finesse, it provides granular control over validation logic.
By crafting client-side scripts within the UI Policy, administrators can set field values and display custom messages based on intricate date validation rules. Though this method may be considered “old-fashioned,” it remains a robust option for those comfortable with scripting intricacies.
Catalog Client Script for Enhanced Date Validation
In scenarios where intricate date validations are necessary, Catalog Client Scripts emerge as a powerful toolset. These scripts allow administrators to handle complex scenarios involving multiple dates while seamlessly adapting to user-defined date formats.
By leveraging Catalog Client Scripts, administrators can effortlessly fetch user date formats and dynamically adjust validation logic accordingly. This ensures a seamless user experience while maintaining stringent date validation rules across catalog items.
Conclusion
Mastering date validation in ServiceNow Washington is essential for streamlining workflow processes and maintaining data integrity. Whether you opt for the intuitive UI Policy Actions, traditional scripting methods, or advanced Catalog Client Scripts, ServiceNow offers a versatile toolkit to meet your date validation needs. By leveraging these tools effectively, administrators can ensure smooth operations and enhance user satisfaction within their ServiceNow environment.